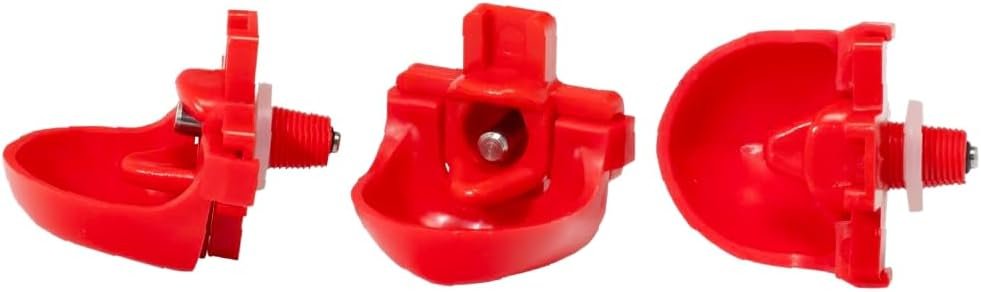
To troubleshoot a leaking poultry nipple, first identify where the water appears: the container wall or fitting, the metal valve outlet, or another part of the supply route. Then match the exact component, supply and assembly to its instructions. A wet patch beneath a drinker does not by itself prove a failed nipple. Keep working drinking water available while the equipment is inspected or serviced, and do not apply one brand’s tightening or pressure rule to every valve.
We may earn a commission when you buy through links on this page.
Begin with a location record
Record the exact drinker or kit, when the moisture was noticed and where it first became visible. Include recent refilling, cleaning, relocation or part replacement. These observations make the question more specific than the waterer leaks, without assigning a cause before the route is checked.
Distinguish water at the container wall from water on a dribble dish or the ground. The first visible wet area may be below the actual source. Follow the accessible route from source to drinking point under the applicable equipment directions rather than replacing the lowest or most conspicuous part immediately.
For example, imagine a damp patch beneath a bucket after refilling. It could be related to the fitting, the valve, the container or the refill event. That example is not a diagnosis or a case we inspected. It shows why the location and timing belong on the record before a repair is chosen.
Record where water first appears
Identify the exact nipple and attachment method
Record the brand, model or kit, drinking attachment and container. A horizontal nipple with a dribble dish is different from a separate auto-fill cup. A screw-in DIY component may also differ from a part secured with a wing nut inside a supplied bucket.
Our nipple-waterer comparison distinguishes those purchases and records the relevant fitting limitations. Use the exact supplied instructions to identify how the component is meant to be held and sealed. Do not assume that a similar-looking replacement or the same reservoir capacity establishes compatibility.
If the orientation itself is uncertain, the horizontal-versus-vertical selection guide explains the mounting decision. A tip’s 360-degree activation claim does not approve mounting the complete valve at any angle. Resolve an incorrectly identified arrangement before treating its behavior as a defective part.
If water appears around the fitting
Look at the container wall, fitting and any specified gasket or retaining nut under the exact assembly directions. Record visible cracks, movement, missing parts or a component that does not match the supplied package. The observation is useful even when the cause still needs manufacturer support.
The RentACoop horizontal-kit manual explicitly distinguishes water escaping between the bucket and nipple threads from leakage at the metal part. That distinction belongs to that kit’s troubleshooting information; it is not proof that every fitting-area leak has the same cause.
Do not turn a model’s tightening direction into a universal repair. The container opening, thread type, wall condition and specified seal still matter. If the fit or applicable instruction is unresolved, stop improvising and ask the maker for the correct arrangement instead of adding more force or enlarging the opening.
If water appears at the metal valve part
Separate water emerging at the outlet from water already resting on the drinking ledge or dish. Record whether the moisture is noticed around a refill, during use or at another time. This guide provides no arbitrary observation interval or pressure-test procedure that proves a valve is sound.
For the selected RentACoop kit, the manual identifies debris around the valve’s sealing area as a possible cause and provides a cleaning procedure. Use that exact procedure for the matching part. Do not dismantle another valve according to the diagram simply because both have a metal pin.
After the prescribed service, check operation under the product’s directions. If the problem persists or the component cannot be identified, contact the maker about the appropriate part or service. A briefly dry outlet is an observation at that time, not a durability guarantee or evidence that every possible fault has been removed.
Check the actual supply before changing the valve
Identify whether the system uses a manually filled reservoir or another connected source. Check the exact product’s documented supply requirement and any specified control components. An adapter that fits is not evidence that the resulting pressure is appropriate.
RentACoop’s six-pack page recommends gravity feed or regulated pressure of 3 psi or below for that kit. Do not transfer that number to other nipples or use a change in reservoir height as a universal repair. Obtain the applicable instructions if the complete supply arrangement is not established.
The automatic-waterer comparison separates low-pressure reservoir systems from founts with a different documented operating range. It can help identify the broad source question, but it does not prescribe a reducer, a plumbing modification or a pressure setting for an unidentified component.
Include the container, support and recent changes
A valve is only one part of the assembly. The current RentACoop bucket-waterer manual calls for inspection of bucket and stand alignment, stability, cracks and wear. Those are relevant observations when equipment has been moved or serviced.
Its fitting instructions apply to that bucket arrangement. They should not be copied to a different DIY nipple, container or replacement part. Keep the exact component and assembly information with the record rather than describing every red drinking part as one interchangeable nipple.
Also record what changed before the leak was noticed. A new attachment, a moved source, cleaning or a different container can help the manufacturer understand the question. The timing is a clue for investigation, not proof that the last change caused the problem.
Avoid turning an uncertain fault into a chemical repair
This guide recommends no universal sealant, thread tape, glue or additive for a leaking waterer. Compatibility depends on the exact part, container and intended drinking-water system. A forum post about a similar-looking fitting does not establish that its material or repair method is appropriate here.
Likewise, do not treat an instruction to clean a valve as permission for any disinfectant or concentrated solution. Follow the product’s applicable cleaning and reassembly directions. A wet fitting does not establish a disease, and a chemical treatment does not replace identifying the equipment fault.
For routine handling, CDC's backyard-poultry guidance calls for cleaning poultry supplies outside the home and washing hands after contact with birds or their environment. That guidance does not authorize a particular adhesive or supply a universal chemical concentration and contact time.
Check the drinking arrangement after service
Keep equipment checks separate from the birds’ access. Under the applicable product directions, establish that water reaches and is regulated at the drinking point. Then observe that the actual birds can use the working arrangement. A visible drop does not prove each bird drank.
Maintain working water access while unresolved equipment is isolated or serviced. Do not withhold water to force use of a repaired attachment. If birds are not drinking or appear unwell, seek appropriate care help rather than extending an equipment observation into a diagnosis or treatment plan.
Keep the observation record, exact model, applicable instructions and any manufacturer response. That gives the next caregiver a clear starting point if the moisture returns. No advertised reservoir volume, absence of a wet patch or one successful refill establishes that future care checks can be skipped.
Common questions
Should I tighten every leaking nipple another turn?
No. First identify the exact component and leak location. Thread type, container condition and seal arrangement differ, and one model's tightening instruction is not a universal repair. Use the applicable directions and ask the maker when the fit or cause is uncertain.
Does water on the dribble dish prove the valve is faulty?
No. Record where and when the water appears, and distinguish the outlet from water already on the dish or another part of the route. Use the exact model's observation and troubleshooting directions. A wet dish alone does not identify a failed component.
Can I fix leakage by adding sealant or changing water pressure?
Do not improvise either change. Verify the exact fitting, container, supply condition and manufacturer instructions first. This guide approves no universal sealant, reducer or pressure setting for an unidentified valve, and working drinking water must remain available while the problem is resolved.
Featured product image from the exact RentACoop via Amazon listing. The photograph shows three views of the selected horizontal-nipple format and dribble dish, not a confirmed leak or three-piece package. Original observation worksheet by Backyard Henhouse.