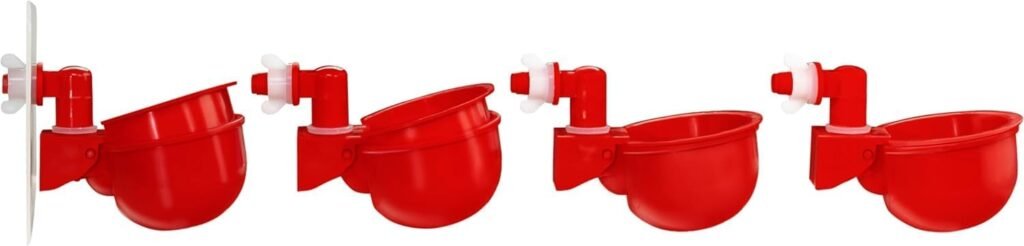
To fit chicken drinking cups, match the exact kit to the container wall, supplied retaining parts and documented water source before drilling. Confirm that the inside can be reached where required and that the bowl can move and be serviced as its maker specifies. Use the applicable instructions for the delivered parts; this guide gives no universal hole size, washer order or pressure setting. Keep working drinking water available while the new arrangement is installed and checked.
We may earn a commission when you buy through links on this page.
Start with the delivered kit and instructions
Identify the exact offer, cup type and supplied components. A standard plastic auto-fill cup, a hooded larger cup and a stem-activated cup may look related while requiring different fitting or drinking arrangements. Check the actual package rather than treating every red bowl as the same component.
Our drinking-cup comparison separates mechanisms, package contents and fitting limitations. Use it if the kit is still undecided. A cup pack is not a complete reservoir and source connection, and a photograph of a finished watering line does not prove every illustrated fitting arrives in the box.
Keep the instructions and model information with the components. Record any missing washer, nut, elbow or cover before making an opening. If a product description and the applicable instructions disagree, resolve that question with the manufacturer instead of choosing the more convenient measurement.
Resolve the fit before making an opening
Check the actual container wall and access inside
Look at the proposed fitting area and how the retaining parts will be reached. A container that holds water is not automatically suitable for every cup. The wall and fitting must meet the exact directions, and the caregiver must be able to complete the specified attachment and later service it.
Lil’Clucker's current guidance, for example, calls for a suitable thin-walled container and access inside to tighten the retaining nut. That can rule out a closed or inaccessible container even when its outside dimensions seem convenient. It is a product-specific requirement, not a wall-thickness standard for all cup kits.
Imagine a cup held against a container whose lid opening is too small to reach the proposed retaining nut. Buying a larger pack or drilling the hole first does not solve the access problem. Select another documented container or complete arrangement before altering the wall.
Resolve the fitting instructions before choosing a bit
The current RentACoop standard-cup page gives two hole-size descriptions: 9 mm in its features and 3/8 inch in its details. Those are different dimensions. Confirm the applicable instruction for the delivered kit and container rather than assuming the numbers are interchangeable.
This guide deliberately does not turn either number into a universal drilling step. Another cup can use another fitting, and an elbow secured with a separate retaining nut is a different arrangement from an unidentified self-threading part. The exact wall, seal and supplied instructions must agree.
Keep any unresolved fitting question visible on the project record. Do not enlarge an opening or add sealant to compensate for a combination whose intended fit has not been established. Obtain the correct information or choose another documented arrangement before proceeding.
Keep the supplied parts in their documented roles
Identify the cup, valve body, elbow, specified seal and retaining parts. A removable bowl insert is not necessarily the valve, and a cover does not replace a washer or retaining nut. Use the applicable assembly diagram to establish what each component does.
The RentACoop Big Cup manual shows its cover as optional and illustrates an inside retaining nut. Those details apply to that kit. They are not an instruction to use the same washer order, cover position or tightening method for every other cup.
Check the actual selected package against its description. The standard RentACoop title says four-pack while its current description lists four cups plus a bonus cup. Confirm what arrived and which parts accompany each cup. A photographed assembly is not a complete inventory or a template for an unrelated fitting.
Leave room for movement and service
For cups that regulate water through movement, the bowl must be able to move as specified. Lil’Clucker’s current page describes the changing water weight opening and closing its valve. A support that holds the bowl in one position can therefore interfere with the intended arrangement.
Include clearance around any hood, insert and serviceable valve parts. A bowl may fit against the wall while leaving insufficient space to remove it for the prescribed cleaning. Check that access on the actual layout before choosing how many cups to place around the container.
This article supplies no universal cup spacing or height. The exact product, actual birds and care route must be considered together. More openings do not automatically create more usable drinking access if the birds cannot approach them or the fittings interfere with each other.
Match the source independently of the hole
A cup can fit the wall while the proposed supply remains unsuitable. Identify whether the source is a manually filled reservoir or another connection, then compare it with the exact valve’s applicable conditions. An adapter that fits does not establish an acceptable operating pressure.
The standard RentACoop page limits pressurized use to a maximum of 3 psi; Lil’Clucker’s current instructions use under 3 psi and prohibit a direct household-mains connection. These are attributed product conditions, not a single pressure prescription for every kit. Resolve the complete source and any specified controls with the maker and appropriate installer.
The automatic-waterer comparison separates pressure-fed and low-pressure reservoir arrangements. Use it to identify the source decision before completing the project. No property-water installation, universal regulator or source-protection device is specified here.
Check equipment operation and actual drinking access
Once the documented assembly is complete, follow the exact product’s setup directions to observe filling and regulation. Look at the connections, container wall and drinking point. Record any continuous flow, interrupted supply or moisture whose source remains unclear rather than immediately blaming the cup.
Then separately observe the actual birds using the working arrangement. A filled cup demonstrates water at the bowl at that time, not that every bird drank. A stem-activated product and a moving auto-fill bowl also create different actions at the drinking point, so do not treat one successful arrangement as proof about another mechanism.
Maintain a working water arrangement while faults or access questions are resolved. Do not withhold water to force use of the new equipment. If the complete cup project cannot be verified or maintained, the broader waterer comparison can help evaluate another complete format instead of repeatedly modifying an uncertain fitting.
Keep a short installation record
Record the exact kit, container, applicable instructions, supplied parts, source conditions and service access. Add any manufacturer clarification that resolved a fitting discrepancy. This makes the project reviewable without relying on a remembered video, a pack color or a measurement borrowed from another brand.
Keep the assembly and care instructions available for the next caregiver. They should be able to identify how the source is checked, which parts may be serviced and whom to contact if the cup does not regulate water. No reservoir volume or automatic label establishes an interval in which routine care can be skipped.
Common questions
Can I drill the same hole for every chicken drinking cup?
No. Match the exact delivered fitting, container wall and applicable instructions. Even the selected standard RentACoop page contains different hole-size descriptions that need confirmation. Do not choose a universal bit or enlarge an uncertain opening to make an unidentified combination fit.
Do I need access inside the water container?
Some cup arrangements require it. Lil’Clucker specifies inside access for its retaining nut, and the RentACoop Big Cup manual illustrates an inside nut for that kit. Confirm the exact assembly before choosing a closed container or making an opening you cannot reach from inside.
Is a cup correctly installed if it fills with water?
Filling is only one observation. Verify the specified connection, movement, regulation, support and care access under the exact directions, then separately observe the birds using the arrangement. A filled bowl does not by itself prove a fault-free supply or drinking access for every bird.
Featured product image from the exact RentACoop via Amazon listing. The photograph illustrates cup assemblies and retaining parts from one selected listing. It is not a cutting template or proof that the fitting suits another container. Original fitting worksheet by Backyard Henhouse.